Install your own Nextcloud server on Ubuntu 16.04 LTS
Create your own Nextcloud server
It is very easy to have your data available everywhere, at any time, nowadays. There are many cloud storage providers that make this service available to anyone. However, data protection isn’t the only reasons to have the whole thing under control.
All you need is a stable server with a good connection, upload and download, and sufficient space for all data, as well as a domain that points to your own server. It is recommended to use Ubuntu 16.04 LTS as the operating system. It is free, easy to use, and very compatible with the latest software.
Additionally, there is a large selection of software that enables the creation of a cloud storage server with Ubuntu. One possible software solution is called Nextcloud. This article explains how to install and set up a Nextcloud Server on Ubuntu.
Preparing your Server
Firstly, you need to connect to your Ubuntu Server via ssh, or just open a terminal if physical access is possible. With gridscale you can also connect via VNC, so you don’t need to allow ssh connections to your server.
After this, some prerequisites must be fulfilled. A LAMP stack must be installed and encrypted, we suggest using Let’s Encrypt. If you need help installing a LAMP stack, the following article will help: LAMP auf Ubuntu 16.04 installieren
Before we start, there are a few things that need to be installed manually. However, before this can happen, the server should be updated with the following command:
Copyapt -y update && apt -y upgrade && apt -y dist-upgradeThen install the following programs and extensions with this command:
Copyapt -y install php-mbstring php php-zip php-xml php-common php-gd php-curlThe server is then ready to continue with the installation.
Install Nextcloud
Unfortunately, Nextcloud does not currently offer a package for installation via APT. Therefore it is necessary to download the latest version (currently version 12.0.0) directly from the manufacturer page.
You can use wget to load the archive directly to the server:
Copywget https://download.nextcloud.com/server/releases/latest-12.zipYou will need to extract the archive by using unzip:
Copyunzip latest-12.zipIf unzip is not installed on the server, you can do so with the following command:
Copyapt -y install unzipThen you will need to move the extracted folder into the right location:
Copymv ./nextcloud/* /var/www/htmlNow you need to change the permissions to the folder nextcloud:
Copychown -R www-data:www-data /var/www/htmlAfter this, please check if all necessary plugins are installed successfully simply by installing them again. If all of them are in place, Ubuntu will tell you “nothing is to do”, otherwise it will install the plugins.
Copyapt-get install libapache2-mod-php7.0 php7.0-gd php7.0-json php7.0-mysql php7.0-curl apt-get install php7.0-mbstring php7.0-intl php7.0-mcrypt php-imagick php7.0-xml php7.0-zip Nextcloud is then accessible via the domain. If a vhost has been created for Nextcloud or it is run in a subfolder, the second part of the command must be modified so that the files are copied to the correct directory.
Warning! If a web page is already running on this server, the content in /var/www/html will be overwritten by the move.
Creating a Database for Nextcloud
In order to create a database for Nextcloud, you have to log on to your own MySQL server as root:
Copymysql -uroot -pYou can then create a database for Nextcloud:
Copycreate database nextcloud;Then create a database user for Nextcloud and grant the necessary rights:
Copycreate user nextcloud@localhost identified by ‘my_password’; grant all privileges on nextcloud.* to nextcloud@localhost; flush privileges; You can now exit MySQL:
Copyexit;Configuring your Nextcloud server
Open your domain with a browser. The following screen should appear:
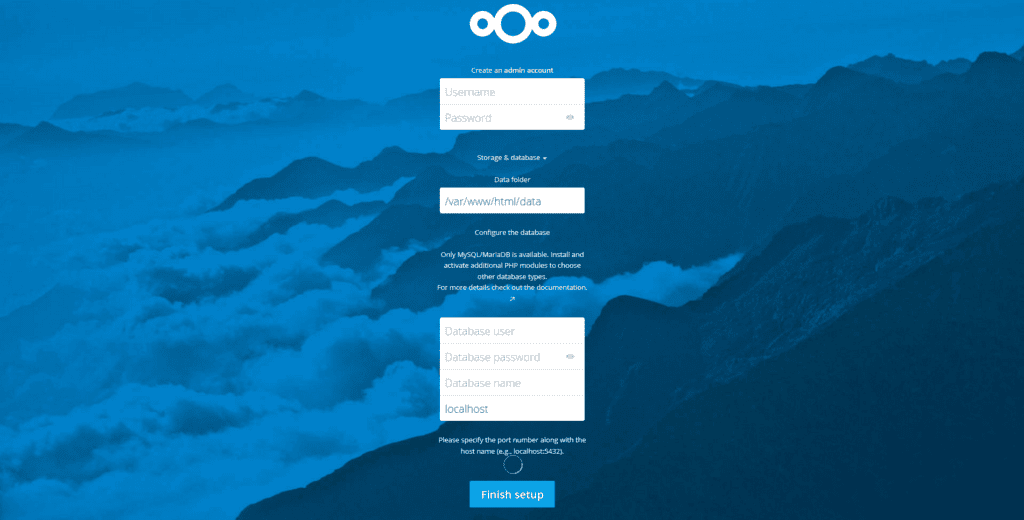
Enter the following information from the top down:
Username: Choose any username for the admin account. “Admin”, “root” or similar should be avoided in order to not make it easy for attackers.
Password: Choose a password. It should have at least 8 characters and consist of lower and upper case letters, as well as at least one number and one special character.
Data directory: Select the path to the folder where the data should be located. Here, it may be convenient to place it on another disk if the disk space on the first disk is too small. If only one disk is connected to the server, the default setting can be left untouched.
Database-User: “nextcloud” (As stated in the last step)
Database-Password: “my_password” (As stated in the last step)
Database-Name: “nextcloud” (As stated in the last step)
Server: “localhost”
Then click “Finish installation”.
Nextcloud is now installed. Links to the mobile apps are shown at the first start. You can then create additional users and create a folder structure according to your needs.
Summary
With Nextcloud, it is very easy to create your own storage server. So you have a central location for files and media and can retrieve it from all devices. There are no additional costs, apart from the costs for the server itself and, if necessary, connection fees for the provider.
Why not try it? With gridscale you can set up a server within a few seconds and rebuild the tutorial. Due to the accurate-to-the-minute billing, no running times or similar occur. And the performance of the server speaks for itself.