Loadbalancing with HAProxy
HAProxy – A useful tool
HAProxy is an OpenSource project that is now many years old and very mature. The name HAProxy is translated as “High Availability Proxy”. As the name suggests, this is a software that is designed to support high-availability services.
I’ve been a great friend of this software for years, and even use it partially, where I do not want to make any high-availability. For example, I can use HAProxy to schedule SSL centrally and not have to worry about it on my web server. Or, if I do not want to make my web server directly accessible from the Internet, HAProxy is an excellent security layer. Also, I can move more comfortably individual domains from one server to another when I have a HAProxy before the web servers.
In short: HAProxy has become one of the most important tools for me. In this article I would like to share with you a few of my experiences and give you an overview of HAProxy. For this I will go into a few basic concepts and will write a little about loadbalancing concepts. You’ll see, in the end, all this is not magic and relatively easy to use. If you have any comments or suggestions for improvement on this article, I would like to receive a brief info at team@gridscale.io. If you have already come through another of my HAProxy articles here, you already know that there are more exciting articles. If not, then search our community for HAProxy. If you want to publish your own experience with HAProxy here, please contact us.
But now to the terms. There are three large blocks to distinguish between each other. ACLs, backend services, and front-end services.
HAProxy ACLs (Access Control Lists)
Using an ACL (Access Control List), you control requests to HAProxy and make logical decisions within HAProxy. For example, the following ACL allows you to redirect all requests to http://site/blog, to a separate web server with an installed WordPress or other:
acl blog_url backend_service /blogDer Aufbau einer solchen ACL sieht wie folgt aus:
acl aclname criterion [flags] [operator] value ...An ACL allows extraordinarily extensive configurations and rules. For example, you can create extensive rules based on a user agent, based on IP addresses, auth headers, and many other criteria.
If you want to block certain user agents, for example, the following configuration extract helps you:
tcp-request inspect delay 10s
acl not_wanted hdr_sub(user-agent) –f /etc/haproxy/not_wanted.lst
tcp-request content reject if not_wanted
The o.s. Configuration abstraction helps you without the rest of the configuration yet, but I would like to point out how powerful the ACL rules of HAProxy are – independent of the OSI layers on which you work.
If you really want to get deep, I recommend you take a look at the documentation of HAProxy. You’ll find it here.
Backend Service in HAProxy
HAProxy understands under a backend service only once any number (greater than one) of services. HAProxy provides its own configuration section for these back-end services. If you choose HAProxy from e.g. The Debian packages installed, then you will find in the directory:
/usr/share/doc/haproxy/examplesA few good examples. The file “url-switching.cfg” is worth a look. In a backend area of HAProxy, as follows:
- What backend services are there?
- How are they grouped?
- What loadbalancing methods do you want to use?
- What timeouts are OK for you and what happens in the event of an error?
- On which layer (OSI Layer 4 – 7) does the transport take place?
- Are you using so-called health checks for your back-end service?
- …
You see, the parameters are very numerous. I will create a few configurations for HAProxy in the context of further articles and explain the most important connections. If you have a section missing or you have questions about other parameters, then ping us briefly. We would like to add further examples to this or other articles.
Frontend Services in HAProxy
So if you have made it to this point, nothing can really hurt you. Frontend is simply said a combination of IP and port at the HAProxy waiting for new requests and then these according to your desire (your wish formulates you also with the ACLs) to the various backend services.
A front end service you define with IP and port (e.g. 1.2.3.4 on the port 567). In the frontend, you also define what exactly happens with the queries and the layer on which they are processed. Layer 4, for example, allows you to load balances without the load balancer having the protocols (e.g., HTTP) itself. As a result, the loadbalancer cannot manipulate these protocols (for example, by an X-Forwarded-For Header in HTTP – more on this later). For this, Layer 4 is the mode by which HAProxy has to work the least and which HAProxy is easy to cope with.
In the following, I will write a little about loadbalancing basics. If you can imagine something under a loadbalancer and the different methods on layers 4 and 7, simply skip the following section.
Load balancing and OSI layer model
A loadbalancer is used to scale an IT service horizontally. Most of the time you decide to use load balancing for reasons of performance, performance and to increase the failure safety. In practice it is usually a mix of different requirements.
An example from our daily business: Imagine that a large news portal needs to handle millions of inquiries per hour. In order for these content to be delivered quickly and reliably, you need a large number of servers. In most cases complex data clusters are located in large data centers, which ensure that the hundreds of thousands of users are always reliably supplied with the requested content.
What this has to do with the various OSI layers, is explaining in this Wikipedia article quite well. The following graphic is an overview of this article.
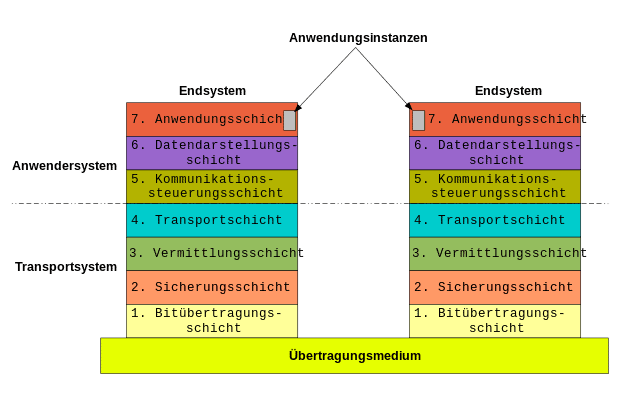
Loadbalancing within the meaning of this article may be placed on the so-called transport layer at the earliest. Below the transport layer, you will only find IP data streams that HAProxy can not loadbalance. For a loadbalancing on the lower layers, you can also look for cluster iptables, also an interesting project. However, I have thus made no positive experiences in productive environments.
OK, back to the actual article. In the front-end section of HAProxy, you define a listener composed of IP and port. So you are automatically on the protocol level (UDP / TCP) and thus on the layer 4 according to ISO OSI. If you also define an application protocol (for example, http), you are in layer 5 – 7. That is, in the plaintext, there are only two load balancing approaches: layer 4 or layer 7.
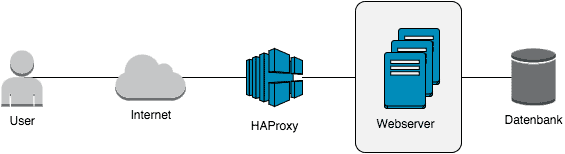
Without a loadbalancer, a connection to your web server looks something like this:

You access the web server directly via the Internet and it delivers the requested content. In some circumstances, as shown in the diagram, you have already moved the database to a separate server, but this is not absolutely necessary.
If you want to use a layer 4 loadbalancer in this case, your first task is to make sure that more than one web server is available with the same content. Randnotiz: If you use the gridscale cloud server, simply clone your Cloud Server using a snapshot and scale your content horizontally.
The following graphic illustrates what changes in direct access:
The HAProxy is now able to distribute requests (e.g. to port 80) to the backend servers. This already ensures a significant increase in the performance and higher failure security of your web servers.
Actually, layer 4 is already sufficient for most situations. But there are quite constructs in which you might want to work with a little more logic. For example, you could redirect all calls to your website to one server pool, but your WordPress blogs will link to another pool. Now Layer-7 Loadbalancing comes into play. This is illustrated by the following graphic:
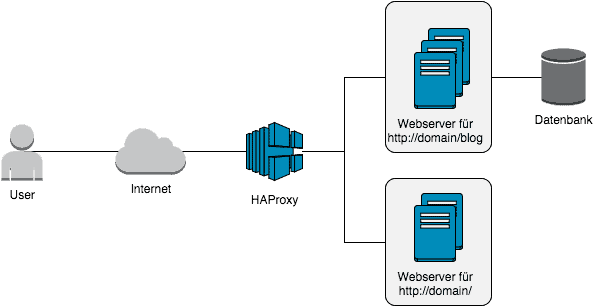
There may be many reasons to opt for such a setup. In the above example, your Web page may not need a database because it is static HTML content. Or you just have completely different load profiles on the different servers and would like to prevent the different contents come in the way. Let your imagination run wild, you’ll find a good application for it 🙂
Loadbalancing Algorithms
For the sake of completeness, please note that you will always have to use three so-called algorithms in the context of loadbalancing. These algorithms are used to decide how a specific request is to be handled and on which the back-end server is forwarded for processing.
Loadbalancer after roundrobin
Most of the time roundrobin is the default (at least F5, Brocade and HAProxy). The configured backend servers are simply supplied with inquiries in turn. In most cases this is also sufficient.
Loadbalancer after leastconn
The leastconn (least connection) method is very useful for finding the fastest possible connection. Different methods are used depending on the manufacturer. Some loadbalancers regularly check by means of a health check (later on more) how fast a web server responds, for example. Based on the response times, a weighting is then calculated and the queries are then distributed over the weighting. A better method is to statistically evaluate the constantly arriving connections and to see which web server responds just as quickly. The load balancer gets directly if the response behavior of the web server changes and the new queries can be directly weighted differently.
However the implementation looks in detail, the effect should be very similar. The load balancer always takes the backend server, which is most likely to answer the query most quickly.
Loadbalancer after source IP (and Port)
With a loadbalancer to source IP (or also IP + client port) one tries to realize a somewhat more static distribution of inquiries. This ensures that a client always lands on the same back-end server. This can be important for temporary files or the like. In my opinion, however, this algorithm has no authorization, since the balancing according to source IP (or possibly source IP + source port) is fault-prone. What happens, for example, when I am editing an article in a CMS, and while my DSL is rebuilding? Maybe I am on another web server with my session and wonder about a strange behavior. From practice, I remember no case, because a project has long maintained load balancing to source IP. It always came to “interesting effects”, with which the technical decision-makers were convinced then, the loadbalancing nevertheless to convert to other algorithms.
More Loadbalancing Algorithms
In addition to the standard algorithms, HAProxy allows further distribution keys. If you want to go deeper, you can find help here.
For the sake of completeness, a brief abstract of the different modes:
- static-rr – Analogous to roundrobin, but with a static weighting of the individual servers.
- first – Simply the first available server
- uri – Appending the called URI (the part behind the domain) creates a hash and distributes it to the available backend servers.
- url_param – With this mode, you can, for example, hide a user ID in the HTTP header and make a decision using this user ID.
- hdr(HEADER) – With hdr you can also analyze the header for specific attributes and make a decision based on these attributes (for example PHP Sess_ID).
- rdp-cookie – This allows you to underline your user a cookie that identifies the correct backend server. An efficient way to ensure that a user does not always land on different backend servers.
The configuration of HAProxy with the different modes always looks identical and is configured either in the listener or on the backend services.
balanceSticky Sessions
Sticky sessions are a good tool to ensure that a user always ends up on the same backend servers. You can, of course, use some of the above Layer-7 loadbalancing methods to do something similar to a sticky session (for example using the hdr (HEADER) or the cookie). But if you’re working on Layer-4, it’s going to be a bit more difficult. Since you are then still the source IP available. However, if many users access the same source IP, then the load may be very unfair. In this case, you can reserve a memory area by creating a so-called stick-table, in which the TCP sessions are assigned to backend servers. The difference between Sticky and source-IP is that, despite many requests, the same sender IP address is ensured that the requests are evenly distributed to the backend servers. The following configuration extract:
listen http_handler
    bind 0.0.0.0:80
    mode tcp
    balance leastconn
    stick match src
    stick-table type ip size 150k expire 15m
    server web1 10.0.0.1:80
    server web2 10.0.0.2:80
So, now only one important thing is missing, health checks. Afterwards you have a comprehensive overview of Loadbalancing and you can make the first configuration of a HAProxy service.
Loadbalancer Health Checks
HAProxy supports, like any loadbalancer, so-called health checks. These small scripts make sure that the backend server is working properly and backend servers, which are no longer accessible, for example, will not receive any further processing requests.
However, health checks can do much more meaningful tasks. Let’s say you have very volatile workloads. At night almost no traffic is on your website. At noon the rush is great. Now you basically have two options. Either you build a static infrastructure and put so many servers in your data center, so you can always use all requests. Or you rely on modern IaaS platforms, which allow you to start new resources in your infrastructure in a split second.
In the latter case, your workload might look like the following graphic for one day.
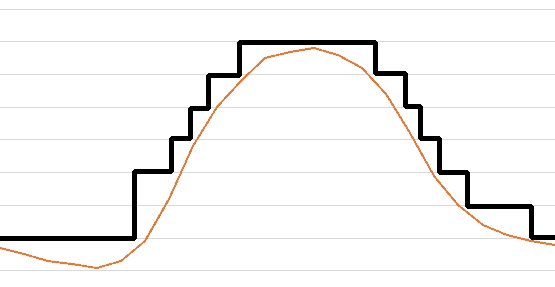
Once the load on your servers decreases, the servers simply shut down. And as soon as you need new resources, the prepared web servers simply start again.
With a health check, you now ensure that newly launched servers are automatically integrated into your workload. Fully automated without touching one finger.
You see, there are many applications for health checks that make your life easier and make your infrastructure very scalable. The simplest possible check only checks the TCP port on the target Web server and looks like this:
server web1 10.0.0.1:80 checkHowever, the checks can be as complex as desired. From my point of view, it is always useful to check whether the target service also really works. For example, a TCP port can be opened without the web server also supplying data behind it.
The following configuration is somewhat more advanced:
listen http_handler
    bind 0.0.0.0:80
    mode http
    balance leastconn
    option httpchk HEAD / HTTP/1.0
    server web1 10.0.0.1:80 check fall 1 rise 2
    server web2 10.0.0.2:80 check fall 1 rise 2
A HEAD is requested from the web server, thereby ensuring that the web server responds. It is even better if you call a PHP script on the target server to ensure that your database connection is successfully opened.
In the example above you have certainly seen that I have passed behind the parameter “check” more arguments. “Case 1” ensures that a faulty web server is immediately taken out of service. The number represents the number of failed requests after a back-end server is decommissioned. “Rise 2” instructs HAProxy to restart a faulty backend server only if at least two healt checks have been successfully executed.
Perhaps this is also interesting: Installation of HAProxy on a Debian