How to gridscale
Welcome to gridscale
Thank you for finding your way to gridscale, the smartest PaaS & IaaS solution. This How To will help you get started with gridscale.
The step-by-step instructions cover everything from registration, your first server, storage, templates & ISOs, snapshots, object storage, IP manager, networking and more.
If you have already created a gridscale account, just go straight to the item > gridscale Panel Overview or use the table of contents to find the item you are interested in.
Registration with gridscale
Start here if you haven’t registered with gridscale yet.
Your registration is completed in just a few steps.
Create a new account on the registration page and confirm your email address from our welcome email. Log in to your gridscale account and enter your payment method and account information. The Account & Settings menu is located at the top right corner of the panel.
After confirming your email address and entering a valid payment method, you will be able to use the full functionality of gridscale.
To get a feel for our intuitive interface, you can also try the Panel without a payment method. While in trial mode, all paid functions are locked.
gridscale Panel Overview
Hereafter you will learn how to keep track of your gridscale Panel. When you first login, you should see a blank dashboard. The dashboard shows you important information about your servers, storage and networks. Additionally, you can use drag & drop to connect or delete objects.
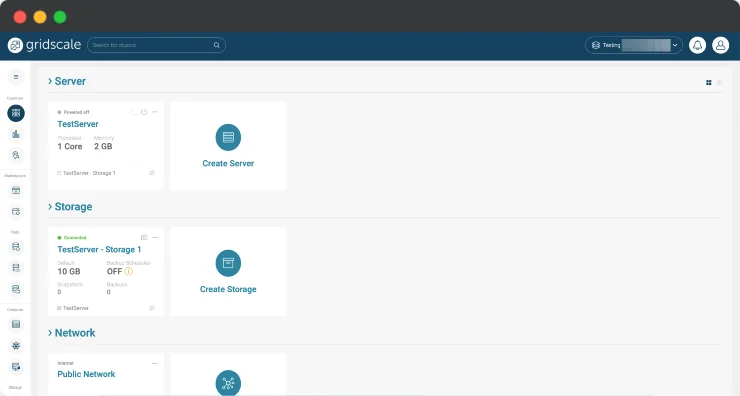
The gridscale Panel is divided into three areas. The main menu is on the left, the content area is in the middle, and the Account & Settings menu on the top right.
Main menu
From the main menu on the left, you can access all the features and functions.
Content area
The centre of the panel is the content area, where you can manage the various features and functions.
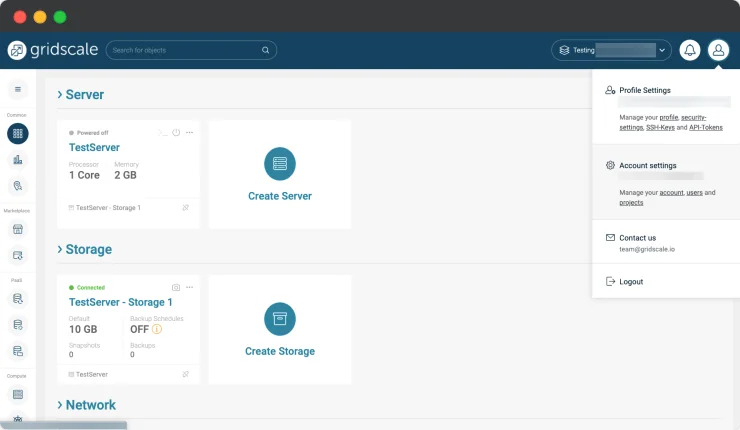
Account & Settings menu
The Account & Settings menu at the top right of the Panel allows you to manage your personal settings.
Account Settings
Settings allows you to change your email address and password. Other features available here include language, 2-factor authentication, and user management.
Billing
Billing allows you to manage your payment methods, invoices, billing details and vouchers.
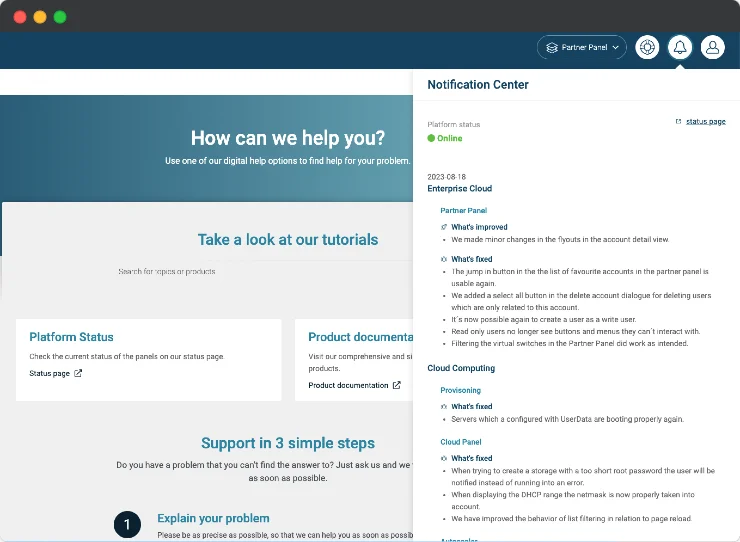
More information
You can also access our service web pages Status and Release Notes.
Creating a server
To create a new server, click on the Add Server box on the dashboard. You will then be able to configure your server. Enter a unique name for your server and use the slider to specify how many processor cores and how much RAM the server should have. To make your server publicly accessible, you can request a new IPv4 and/or IPv6 address under Connect server to the Internet.
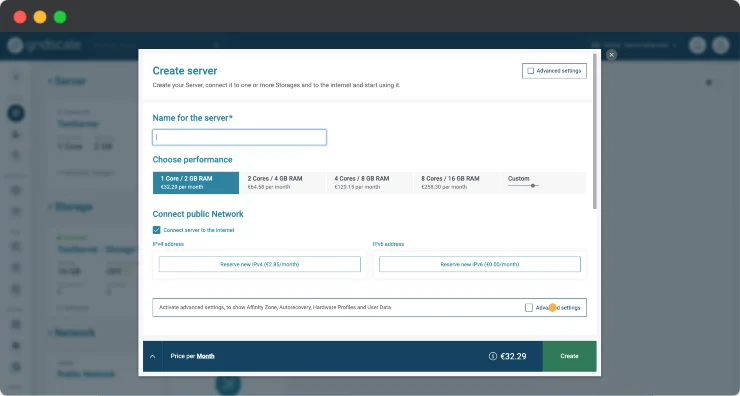
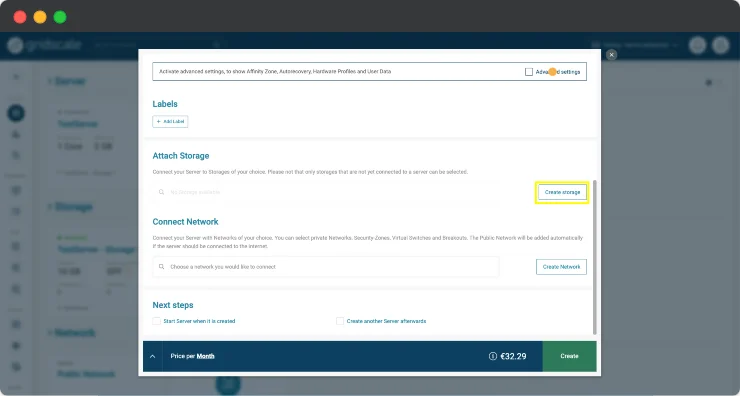
In the next step, you can add storage to the server. It is also possible to create a server without storage and connect it to your server later.
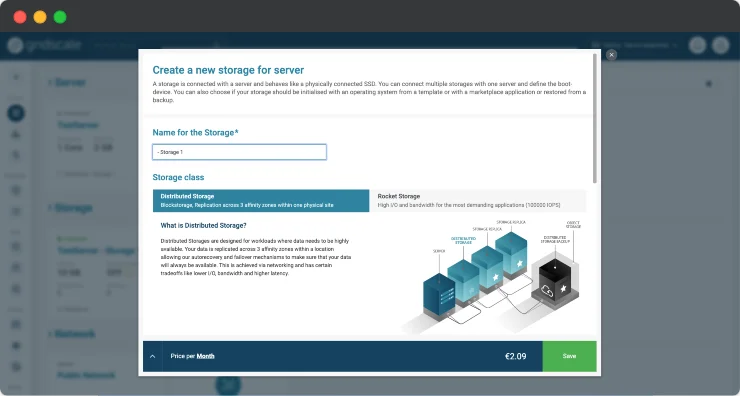
To add storage directly to your server, click Create storage.
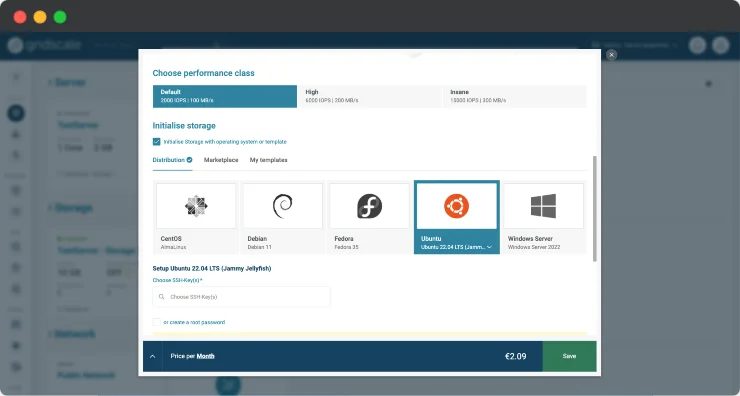
You can set the storage name and size under configuration. You can also set the speed for your storage and choose from three SSD storage classes.
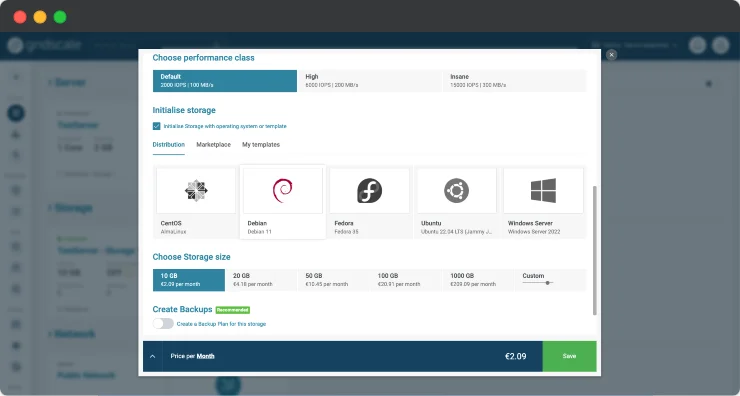
Afterwards, you can choose from a wide range of gridscale templates so that your server will have an operating system right out of the box when it is first booted. You can also equip the server with 1-Click Apps or your own template. Then enter the SSH key and/or root password and a hostname in the selection dialogue.
If you want to install the operating system using your own ISO image, first create the server with an empty storage. If you want to install the operating system using your own ISO image, first create the server with an empty storage. See the ‘Inserting your own ISO image’ section to learn how to integrate your own ISO image.
Starting servers
Servers can be started and stopped using the power button in the right-hand corner. The safest way to shut down your server is to use ACPI Shutdown. Right next to it you can access your server’s VNC console via the >_ icon.
Storage
Just like servers, storages can be created separately and then connected at a later point in time. The workflow is identical to the one above. To create a new storage, click on Add Storage in your dashboard. Again, you can choose to create the storage using a gridscale template, 1-Click Apps, a custom template, or leave it blank. To connect your new storage to your server, simply drag and drop it to the appropriate server.
Adding additional storage to the server
To add additional storage to your active server, first click on your server and then add additional storage using the ‘Create Storage’ menu item.
If you need more storage while running your server, you have two options to expand your storage. You can either increase your storage on the fly while the server is running, or you can connect additional storages to the server, which requires the server to be powered off.
A newly created storage (without template) behaves like an empty hard disk. Before you can use the SSDs, a file system must be created (and partitions if necessary). A cloud server can be connected to up to 8 storages.
Note: It is possible to downsize storages, but we do not recommend it. Downsizing can lead to data loss!
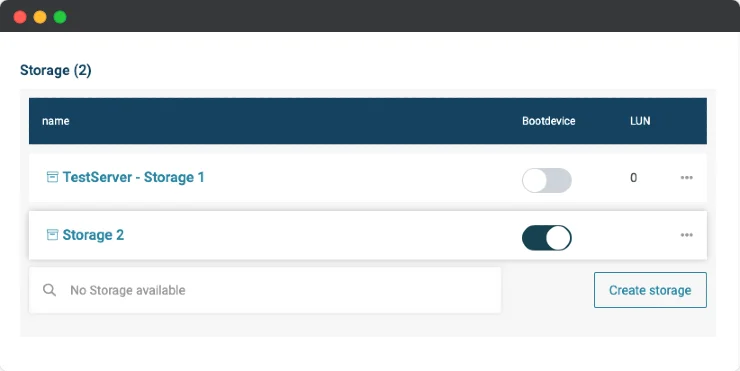
Boot Device
If you have multiple storages on your server, the first one connected to the server will automatically be the boot device. In the detailed view of your server, ‘Connected storages’ shows you which storage is the boot device. In order to set a different storage as the boot device, you can select the respective server in the detailed view.
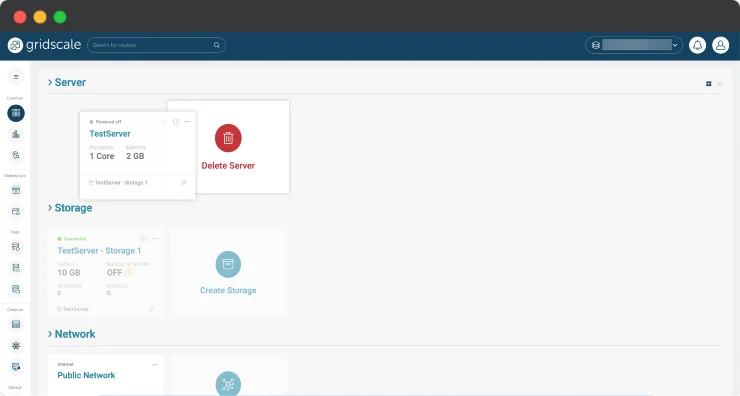
Deleting Server and Storage
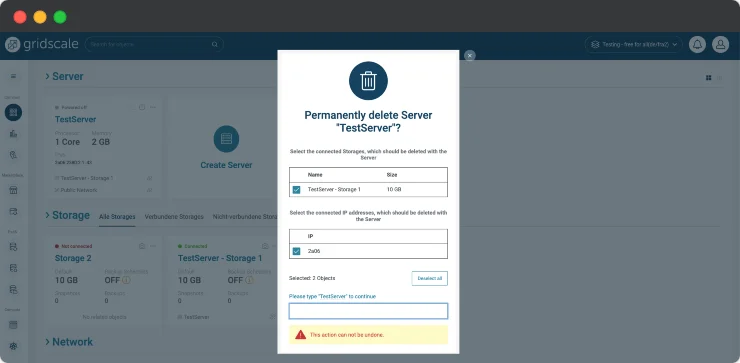
If you want to delete your server or storage, first make sure they are not in use. To delete them, simply drag the tiles on the recycle bin icon. You will also be asked if you want to delete any storages, IP addresses or networks connected to your server.
Deleting the server alone has no influence on your storage or your data. Only if you explicitly delete the storage, your data will be lost!
You will then be prompted to confirm the deletion of the selected server or storage. You also have the option to delete connected storages, IP addresses, or networks in this step.
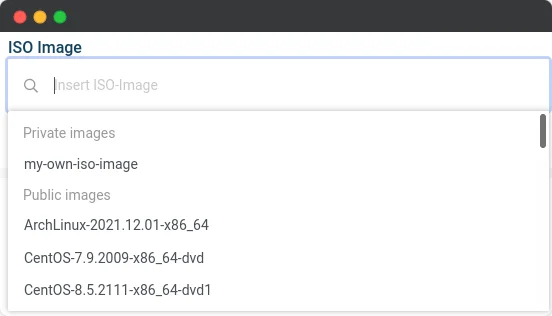
Inserting your own ISO image
If you have not found a suitable operating system among our templates, you can simply insert your own ISO image.
To do this, first download the ISO image from the URL in the ISO Images menu. Then create the new server, starting with empty space. You can then select your own ISO image or one of our public ISO images in the detailed view of the new server under Connected ISO images.
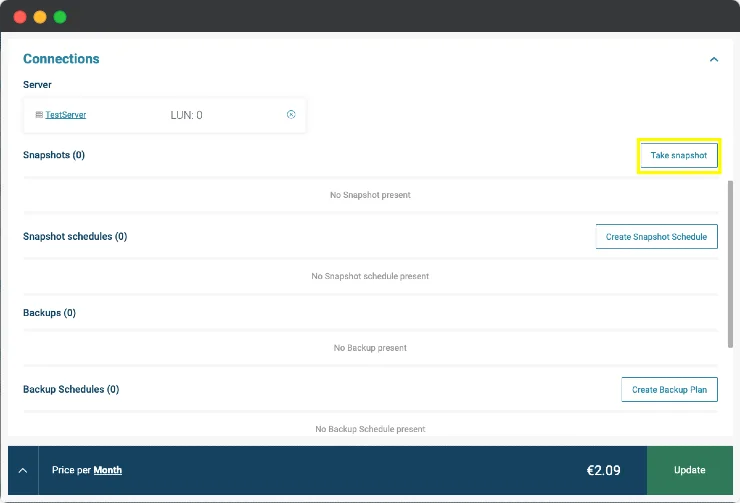
Snapshots and Templates
Create a snapshot
The Snapshot function allows you to create an exact image of the state of your storage. Once you have taken a snapshot, you can reset the storage to the state it was in at the time of the snapshot with a single click. Please note that the current state will be lost!
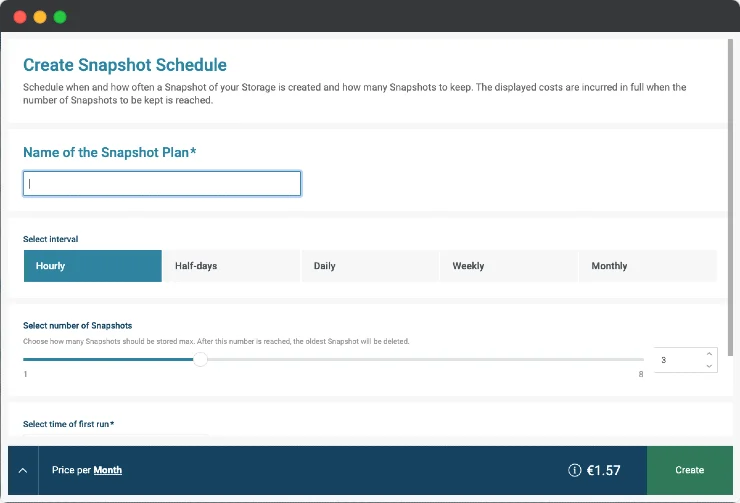
Create Snapshot schedule
You can also use the snapshot scheduling feature to take automatic snapshots of your storage. Set the time and interval at which you want to take a snapshot.
Convert snapshot into template
It can be very useful to convert a snapshot into a template. You can use your own templates to install your servers. With custom server templates, you can have fully configured systems up and running in seconds.
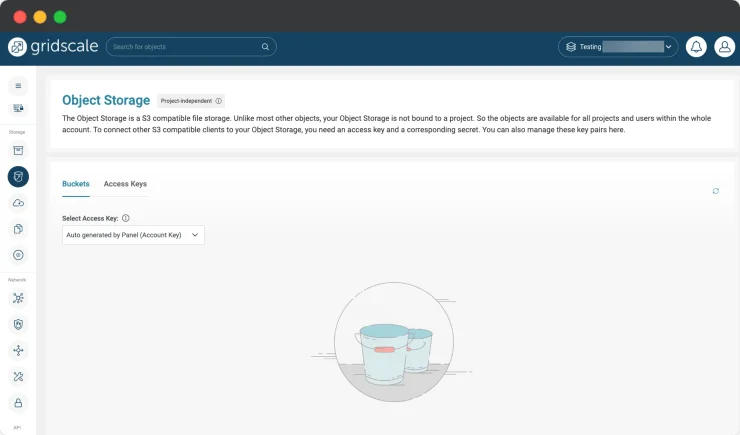
S3-compatible Object Storage
Our object storage with S3 compatibility offers you a flexible storage solution for the most diverse use cases. You can export your snapshots to the object storage, use it for backup and archiving purposes or as external storage for your tools.
In the Object Storage area in your Panel, you can manage your access keys and your object storage buckets. In this area you can create new access keys, consisting of key and secret, and object storage buckets. You can also manage your buckets directly via the Panel, but we recommend using an S3 tool for larger amounts of data. We show you how to set up access for your tools to the object storage and which tool you can best use for the upload in the gridscale quick guide S3-compatible object storage.
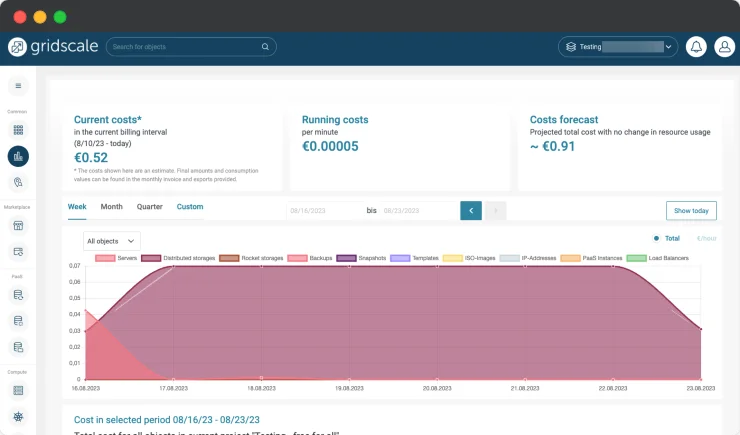
Usage
The Usage section gives you a complete overview of your costs and allows you to control your consumption. Your current and past costs are displayed clearly and systematically. Bills are available in the Usage section for all resources used. You can also check your account limits and current usage.
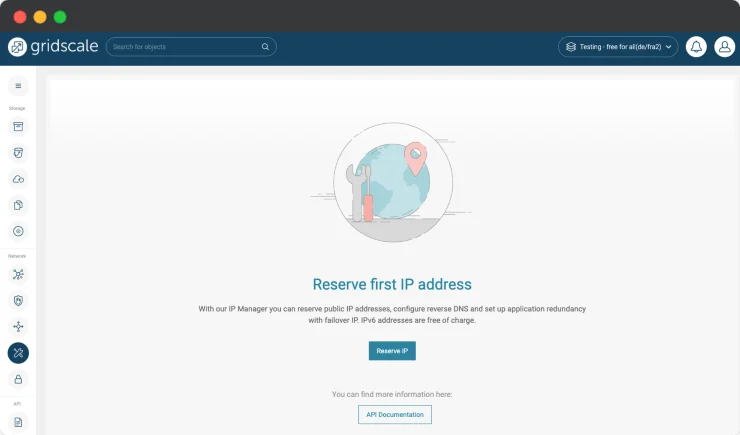
IP-Manager
The IP Manager section helps you manage your IPv4 and IPv6 addresses. Divided into IPv4 and IPv6 addresses, you can request, release or delete them. IP addresses that are in use must first be released before they can be deleted. If you want to assign an existing IP address to a new configuration (server, load balancer), it must also be released. Released IP addresses are available in the drop down menu for selecting public IP addresses.
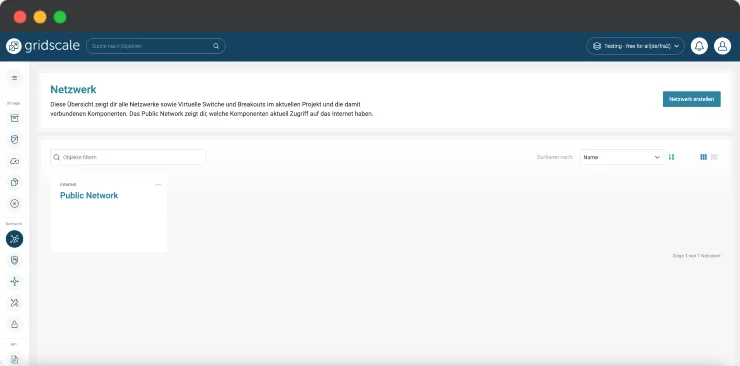
Creating and managing networks
Network configuration on the public network is done automatically via DHCP. You can also create private networks for more security. Private networks are always completely isolated from other networks. If you want the servers on the private network to have access outside, you can set up a server as a gateway server. A new network can be easily created by clicking on New Network in the Dashboard. You can also enable Layer 2 security for your networks, protecting your servers from MAC and ARP spoofing.