Reverse-Proxy – A useful Tool
A reverse proxy is a tool that intercepts and handles http(s) requests. The reverse proxy can forward it to different servers, caching the response, thus relieving the underlying web servers or distributing the load to uniformly different systems. All in all, a very handy tool for busy services or multiple small servers.
Today I’ll show you how to build a proxy with Apache, which converts your requests from http to https, including a valid certificate, and then redirects them to two more servers. If the other two systems are in the same local network, you can forward the request via http. If your servers use public IPs, you should protect the forwarding with https. I’ll show you how to do both methods.
Prepare the server and install Apache2
First you need a server with Ubuntu 16.04 LTS. Create one quickly on the Cloud provider of your choice and then continue here.
How to create a Server on gridscale, I will show you here: How to gridscale. Creating a Server on gridscale takes just a few seconds.
Before we turn your server on, you have do a bit of preparation first: Your domains A-Record must be set to the IPv4 address of your server and the AAAA record to the IPv6 address of your server. How this works, depends on your domain provider.
After both records are set, you can connect via SSH to your server. The, update your server with the following command:
apt –y update && apt –y upgradeNow install Apache and Let’s Encrypt. (If you want to build your Reverse-Proxy without a domain, you can skip the points on Let’s Encrypt):
apt –y install apache2 python-letsencrypt-apacheOnce the installation is complete, edit the config for your Virtual Host. For the sake of simplicity I use nano, of course you can use an editor of your choice:
nano /etc/apache2/sites-available/000-default.confHere you enter your domain in the first line so the result looks something like this:
<VirtualHost meine-domain.tld:80>Of course you have to replace the highlighted part with your domain. Next, specify the ServerName and ServerAlias below:
ServerName my-domain.tld
ServerAlias www.my-domain.tld
If you use a sub-domain, you can simply omit the serverAlias.
The entire config should look something like this:

Let’s Encrypt: Create a certificate for your domain
Then it’s time for Let’s Encrypt. Use the following command to create a new certificate for your domain and configure the redirect to https:
letsencrypt --apache -d my-domain.tld -d www.my-domain.tld
The second entry can be ignored if you use a sub-domain.
 In the next step, Let's Encrypt asks you for your e-mail address. Here you should enter a valid address as you will be informed about the expiry of your certificate. In the next step you accept the terms and conditions and then choose the "Secure" -Config.
 After a short time, Let's Encrypt should congratulate you for your new certificate and create a new config. Now let's have a look at this file:
nano /etc/apache2/sites-available/000-default-le-ssl.confThere are two options from here. The server behind the proxy can either be reached via a public or local IP. I recommend to make the servers accessible with Let’s Encrypt via https. Alternatively, you can also create an http connection.
First, I’ll show you the recommended variant for https connections.
Replace the part between <VirtualHost …> And </VirtualHost> With the following details:
<VirtualHost my-domain.tld:443>

    SSLProxyEngine On
    SSLProxyVerify none
    SSLProxyCheckPeerCN off
    SSLProxyCheckPeerName off
    SSLProxyCheckPeerExpire off
    ProxyPreserveHost off

    <Proxy balancer://myloadbalancer>
       	BalancerMember https://webserver01.tld/
      	BalancerMember https://webserver02.tld/
    </Proxy>

    ProxyPass / balancer://myloadbalancer/
    ProxyPassReverse / balancer://myloadbalancer/

…

</VirtualHost>
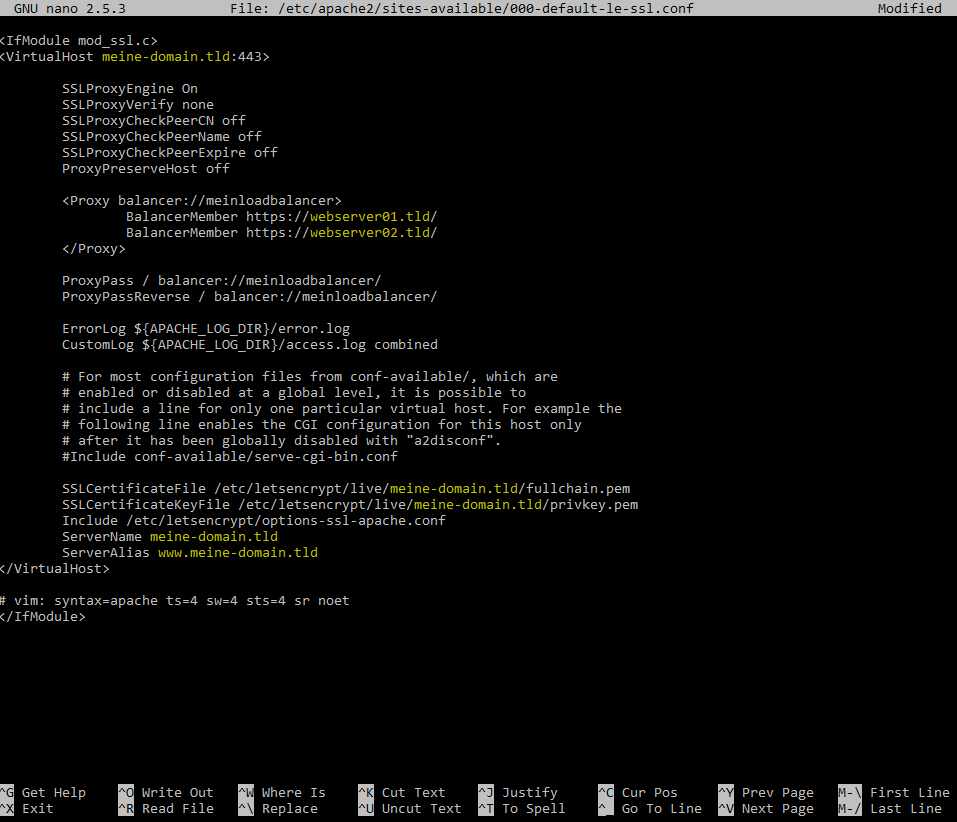
In the End it should look like this:

If you do not want to use https between your servers, you need to edit the first file as follows:
nano /etc/apache2/sites-available/000-default.confIn this file you can delete everything between the VirtualHost tags and replace them with the following text:
<VirtualHost my-domain.tld:80>
    ProxyPreserveHost on

    <Proxy balancer://myloadbalancer>
         BalancerMember http://webserver01.tld/
         BalancerMember http://webserver02.tld/
    </Proxy>

    ProxyPass / balancer://myloadbalancer/
    ProxyPassReverse / balancer://myloadbalancer/

    ServerName my-domain.tld
    ServerAlias www.my-domain.tld

</VirtualHost>
Either way, save the config and exit nano. Enable a couple of mods and reboot Apache and then we’re already to go.
a2enmod proxy
a2enmod proxy_http
a2enmod proxy_balancer
a2enmod lbmethod_byrequests
a2enmod proxy_connect
service apache2 restart
Summary
With these simple steps, you can build your own reverse proxy, balancing the load on your servers. As well as the the examples shown here, a reserve proxy can be used for many other purposes, including Web Acceleration and Anonymity.