HAProxy Tutorial: Installation on Debian/Linux
HAProxy Tutorial – Installation and Configuration
In this HAProxy tutorial I will guide you through the installation and configuration of HAProxy under Debian / Linux and bind two web servers as backend systems.
If you do not have a lot of experiences with load balancers and you are interested in a few basics, scroll through my article Loadbalancing with HAProxy.
In this setup, I go through bit by bit through different configurations and loadbalancer modes.
Server preparation

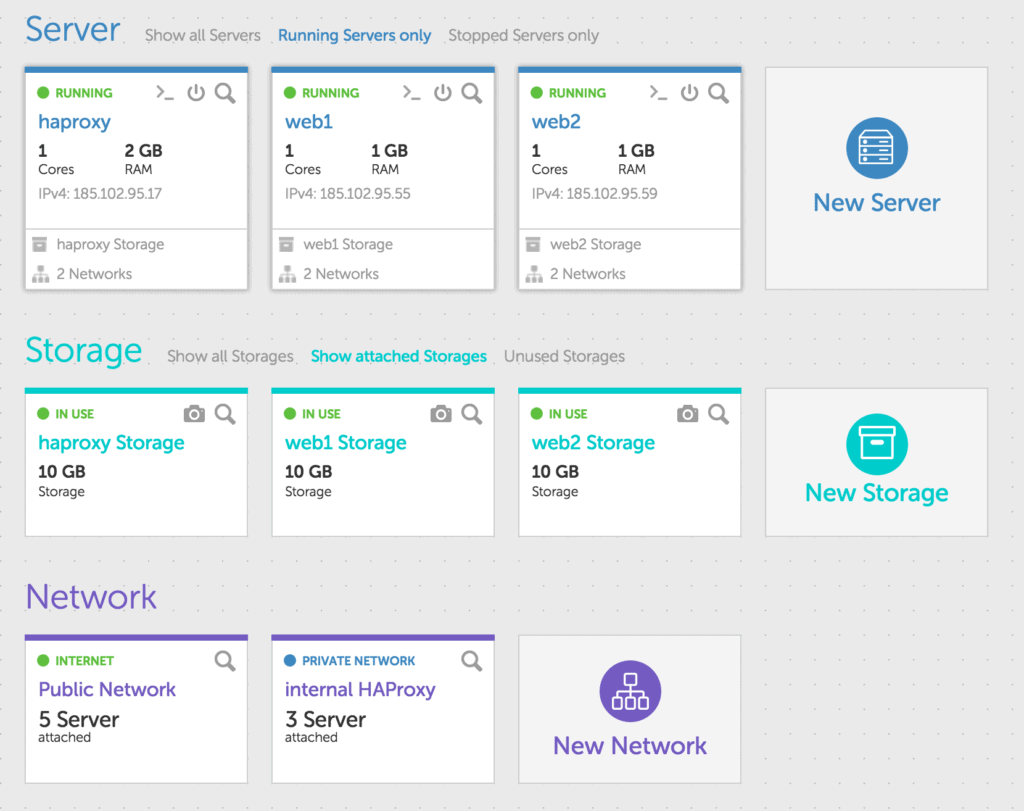
First install three new servers with your cloud hosting provider. In this article, I use cloud servers on our platform 🙂 but you can also use the installation and configuration on any other hosting provider.
With gridscale, you can configure internal Layer-2 networks and network your Cloud Servers internally. I use this function in this manual. If your cloud hosting provider does not provide you with internal networks, simply work with the public IP addresses of your new servers.
On my servers I installed a fresh Debian 8. You can, of course, use any other distribution, such as CentOS.
[sc name=”Tutorials-Signup”]
Installation HAProxy
First, prepare your Cloud Server with HAProxy. In Debian, you simply use apt-get to install the required packages. I install some more stuff like ‘vim’ or ‘wget’, you can do without it, of course.
root@haproxy:~# apt-get -y install wget vim haproxyNow configure the internal network on the HAProxy server. Just edit the file / etc / network / interfaces and insert:
auto eth1
     iface eth1 inet static
     address 10.0.0.1
     netmask 255.255.255.0
     broadcast 10.0.0.255
Then restart the network and check whether the interface eth1 is configured.
root@haproxy:~# /etc/init.d/networking restart
[ ok ] Restarting networking (via systemctl): networking.service.
root@haproxy:~# ifconfig
eth0      Link encap:Ethernet  HWaddr 1e:db:db:8b:c1:01
...

eth1      Link encap:Ethernet  HWaddr 1e:db:db:8b:c1:02
          inet addr:10.0.0.1  Bcast:10.0.0.255  Mask:255.255.255.0
...

root@haproxy:~#
Now configure some bindings on your HAProxy so that we can provide a service with different configuration options per binding afterwards.
You can find all configuration files in ‘/ etc / haproxy’. First open the file ‘haproxy.cfg’ and get a brief overview.
You can skip both the global and the defaults section. At the end of the file, create a few listeners and create the corresponding backend services.
frontend port_80
 bind *:80
 mode http
 default_backend port_80

frontend port_81
 bind *:81
 mode tcp
 default_backend port_81

backend port_80
 mode http
 balance roundrobin
 option httpchk HEAD / HTTP/1.0
 server web1 10.0.0.2:80 check
 server web2 10.0.0.3:80 check

backend port_81
 mode tcp
 balance roundrobin
 option httpchk HEAD / HTTP/1.0
 server web1 10.0.0.2:80 check
 server web2 10.0.0.3:80 check
With the configuration you have a working HAProxy. Now quickly configure the webserver.
Installing your Webserver
All subsequent commands simply run on both webservers so that the installations are the same. First install a few packages. All possible dependencies should be solved, at the end you will then have a web server with PHP5 available. I would like to use PHP5 later in order to output a few data on the web server.
$ apt-get -y install vim wget libapache2-mod-php5Now edit the file ‘/ etc / network / interfaces’ on your servers and upgrade the network interface eth1 with an internal IP. For web1 I have 10.0.0.2 and for web2 I have taken 10.0.0.3. You can check the configuration file and the command to restart the network interfaces from your HAProxy server.
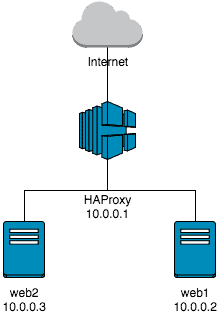
Overview of your current installation
If everything has worked, then your installation should look as follows.

You can easily test whether your HAProxy works. Just call the IP address of your HAProxy server in your web browser. You should get a default web page from Apache2.
If this works, try the same with port 81. Again, the web server should present its standard page.
Let’s take a quick look at the configuration of why this is so. First, we created a listener on port 80. All requests that HAProxy receives on port 80 are forwarded to the backend servers, which are grouped under the group “port_80”. Port 80 has a so-called Layer-7 Loadbalancing (to recognize at the mode http). Port 80 does not have a sticky session configured, i.e. your requests are distributed between the web servers.
For Port 81 (Layer-4 Loadbalancing) it behaves similarly. Port 81 is configured without a sticky session. This means your requests are also distributed over port 81 between web1 and web2.
Well, then test a little more. Create a text file on your webserver in the / var / www / html directory. Just name it test.txt and write the hostname. So on web1 “web1” and on web2 “web2”.
Now, use your public IP address and port 80 to retrieve the test.txt file several times at short intervals. You should always change between web1 and web2.
Change the port to 81 and ask the test.txt again in short term. What do you see?
Extend the interval of the queries until you switch again between the individual web servers. Although configured as a balancing mode roundrobin, you stick to one of the webserver for about five seconds. Only when there are more than five seconds between two requests is your TCP session redistributed and possibly landed on another web server. This is because the TCP session is not closed immediately and you have the opportunity to send another request to the already opened TCP session.
PHP for reading web server info
To get to a few of the headers on the web server, I have PHP installed directly. Just put a new file after ‘/ var / www / html /’ with the name “info.php”. Write to the file:
<?php print_r($_SERVER); ?>If you now call the info.php via port 80 or 81, you will see a few more information about your webserver and about the connection setup.
If you look at the output exactly, then you will find that no place your IP address appears. Instead, the internal IP address of the HAProxy can be seen in both cases.
HAProxy and X-Forwarded-For Header
Let’s first change the header so that you can also recognize the IP address of the requesting client on the web server. Here, a standard has established itself, the so-called X-Forwarded-For Header. This should always be set if, for some reason, the client IP is hidden. Otherwise you have on the web server no way to determine which client IP has caused a specific request.
Add the following to your port_80 backend below ‘mode http’:
http-request set-header X-Forwarded-For %[src]Now call your info.php over port 80 again. You should now be able to recognize the header ‘HTTP_X_FORWARDED_FOR’ with your public IP. The whole thing has a small catch: Should there be between you and your HAProxy another proxy, which has already set the X-Forwarded-For Header (you do not terminate so with your public IP on the HAProxy), then you override now Existing header with the wrong, namely the proxy server, IP address. But later on more.
You should now be able to recognize a significant difference between Layer-4 and Layer-7 Loadbalancing. It is not possible to manipulate the higher protocol in a layer 4 Loadbalancer. Perhaps now not a big disadvantage. However, as soon as you want to make more extensive manipulations or logical decisions, Layer-4 can no longer relieve you of the work.
Example Layer-7 Loadbalancer and URIs
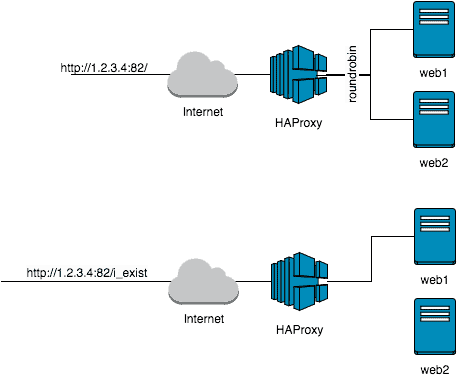
Let’s briefly define a new front-end and a new back-end service to make further tests. Just add to the end of the haproxy.cfg and restart the service:
frontend port_82
 bind *:82
 mode http
 acl my_rule path_beg /i_exist
 use_backend alternative_82 if my_rule
 default_backend port_82

backend port_82
 mode http
 balance leastconn
 http-request set-header X-Forwarded-For %[src]
 option httpchk HEAD / HTTP/1.0
 server web1 10.0.0.2:80 check
 server web2 10.0.0.3:80 check

backend alternative_82
 mode http
 balance leastconn
 http-request set-header X-Forwarded-For %[src]
 option httpchk HEAD / HTTP/1.0
 server web1 10.0.0.2:80 check
Now create the directory ‘/ var / www / html / i_exist’ on your web1 and place a text file “test.txt” there with some content. Do not put this directory on web2, because the HAProxy configuration ensures that only web1 receives the requests for this directory.
Summary
So what have you configured now:
- Three new cloud servers (presumably with Debian 8), which are interlinked internally.
On a cloud server you have a HAProxy installed, on the other an Apache2 with PHP5
You have successfully created a layer 4 Loadbalancer in HAProxy (port 81)
You have successfully created a layer-7 loadbalancer (port 80) in the HAProxy and manipulated headers at the same time - And you have caught a certain URI in the HAProxy and redirected to a separate backend server
This is quite good. What is missing now are the Sticky Sessions (more later), a few advanced configurations and, of course, still SSL.