Dockerize WordPress with Docker Compose
WordPress Multi-Container Application
Docker-Compose is a tool with which you can easily and comfortably define and start multi-container applications. In this tutorial we will run Docker-Compose for two applications (WordPress and MySQL), side by side in an isolated Docker-Container environment.
If you are just starting with Docker and haven’t installed Docker yet, I can recommend you start with our tutorial Docker on Ubuntu 16.04 LTS – A Simple Recipe. Maybe you are already one step further and have already started Docker containers manually with Docker container run? Starting Docker Containers manually has some disadvantages. The list of parameters can quickly become long and complex. Imagine you are working in a team and a colleague should deploy the same application. You have to send him the confusing commands, additional comments and information about the order of execution and other things. That’s why Docker took over the open source project Fig in 2014, which was converted to Docker Compose in 2015.
How does Docker-Compose work?
In a YAML File you define how your multi-container application should be structured.
Information defined in the YAML file includes which image to use, which ports to use, which volumes to use, and how to set environment variables. Docker-Compose accesses the defined YAML file and automates the starting process of the containers. The pulling of the images, the creation of the network, the starting of the containers etc. is all done in one go with only one CLI command (and in the right order!).
Preparations
You can follow the tutorial locally or remotely on a VPS, the only requirement is an installed Docker-Engine and Docker-Compose. On a desktop system like Mac & Windows, Docker-Compose is already installed automatically via the installer. Under Linux systems Docker-Compose has to be installed in addition to the Docker-Engine. I’ll explain how to do this below.
I am running the tutorial on a gridscale VPS with Ubuntu 16.04. In our gridscale Cloud-Panel you can build your own Cloud-Server with Linux-System with just a few clicks to get started right away.
Install Docker-Compose
Follow the steps below to install Docker-Compose on your Linux system. The installation will download the Docker-Compose GitHub repository via Curl.
1. download the latest version of Docker-Compose:
Copysudo curl -L https://github.com/docker/compose/releases/download/1.20.1/docker-compose-`uname -s`-`uname -m` -o /usr/local/bin/docker-compose Note: Check the GitHub repository page to see if the version number is still current and edit it in the above command if necessary.
2. add the permissions to run the program:
Copysudo chmod +x /usr/local/bin/docker-compose 3. optional step – add auto-complete to bash and zsh
4. test the installation:

Copydocker-compose --versionPrepare directory
First I create a new directory under /srv plus three subfolders (plugins, themes, uploads). We define the folders in our YAML file as mount points to our WordPress Docker container. This way we achieve a certain data persistence. Your WordPress data is outsourced from the Docker container where you can manage it yourself.
Copymkdir -P /srv/wordpress/Copycd /srv/wordpress/Copymkdir plugins themes uploadsAt the end the following directory structure is given:

Create YAML file
Docker-Compose processes YAML files, YAML is a simplified markup language.
When creating a YAML file, you have to pay attention to the correct syntax and indentation, otherwise YAML will complain very fast. Frequent reasons for the problems are copy and paste or if you use tabs instead of spaces when indenting. As extension you can use .yml or .yaml, there are no differences between the two.
Everything about Compose syntax and all versions can be found in the Docker documentation: https://docs.docker.com/compose/compose-file/
Tip! You can also use an online editor to create the YAML file: https://jsonformatter.org/yaml-formatter
Let’s Docker!
First create a new file named docker-compose.yaml in the WordPress directory /srv/wordpress with an editor of your choice.
The file docker-compose.yaml for our container setup looks like this:
Copyversion: '3.6' services: db: image: mysql:5.7 volumes: - data_db:/var/lib/mysql restart: always environment: MYSQL_ROOT_PASSWORD: mypassword MYSQL_DATABASE: wordpress MYSQL_USER: wordpress MYSQL_PASSWORD: wordpress wordpress: image: wordpress:latest depends_on: - db ports: - 8080:80 restart: always environment: WORDPRESS_DB_HOST: db:3306 WORDPRESS_DB_USER: wordpress WORDPRESS_DB_PASSWORD: wordpress volumes: - .wordpress/plugins:/var/www/html/wp-content/plugins - .wordpress/themes:/var/www/html/wp-content/themes - .wordpress/uploads:/var/www/html/wp-content/uploads volumes: data_db: Then save the file.
As you can see, you can already deduce from the file what should happen during the creation. In the first line the Compose version is given and then the container services are defined. We give the database the name “db” and as an image for the service we extract MySQL 5.7 from the Docker Hub. Under Volumes we map the default MySQL directory to the container directory “data_db”.
Thereby all updates to WordPress have no influence on the volume data_db. At the end the corresponding environment variables of the database are defined, for the root password and the WordPress database password you best choose secure passwords.
In the second section the WordPress container is defined, depends_on defines the dependency to the database container. Under Image we get the latest WordPress version and under Port we map port 8080 on the host to port 80 on the container (on host side you can specify any port you have). In the environment variable “WORDPRESS_DB_HOST: db:3306”
we define the database container db as database for WordPress, 3306 is the default MySQL port to connect to.
Start container project
Once you’ve saved the file, you’re ready to start your container application. Thanks to Docker Compose, all you need now is one command:
Copydocker-compose up -dDocker Compose automatically detects the YAML in your current directory, runs through your configuration, and launches the container application.
To take a look:
Copydocker psyour containers have been started.

The end of the tutorial is approaching and the goal is to see, via the IP address of your VPS and the specified ports (in our case :8080), the well-known WordPress welcome screen is accessible.
Copy[your-ip]:8080/wp-admin/install.php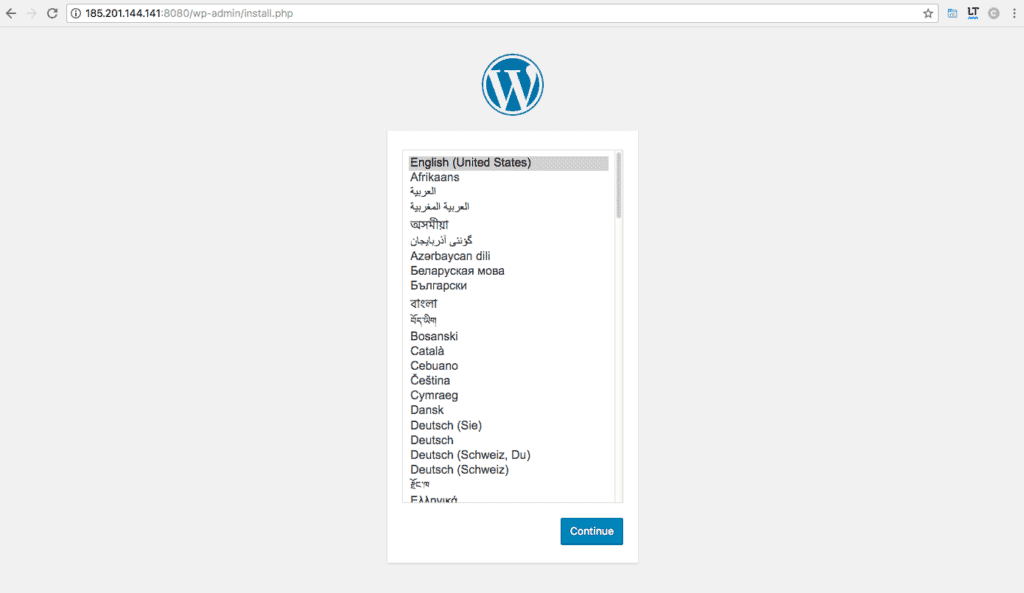
If you followed the tutorial on a local machine, you may need to find out your Docker Host IP address. With the command
Copydocker-machine ip defaultyou will see the IP address where you can access your WordPress.
Summary
Docker-Compose is another tool from the Docker ecosystem that you’ve come across. I introduced you to the concept behind Docker-Compose and you should now be able to define even simple multi-container applications. On your way to Docker Master, there are other Docker tools that you need to get to know better: Docker Engine, Docker Hub, Docker Machine and Docker Swarm are these candidates. To get you started with Docker Swarm, an article Docker Swarm vs. Kubernetes: Both container management tools in comparison and a tutorial Docker Swarm Cluster create is waiting for you in our gridscale developer community!
Do you still have questions, suggestions or would you like a new Docker tutorial on a specific topic? Just send an email to team@gridscale.io