Introduction
In this tutorial I will show you how to install Terraform on Ubuntu and how to easily create new servers as well as storages in the gridscale panel using Terraform.
With Terraform you can manage your infrastructure as code. This allows you to automate processes, resulting in fewer errors than with manual setup. The infrastructure is easier to scale and re-use. Furthermore, it is possible to save the state of the infrastructure and also offer the configuration files as documentation. Another advantage is that Terraform can be used platform-independently.
Prerequisites
If you don’t have an account yet, you can register here.
First, you should establish an SSH connection to your server via your computer’s terminal.
Copy# ssh root@ip-address
and replace “ip-adrress” with the IP address of your server shown in the gridscale panel.
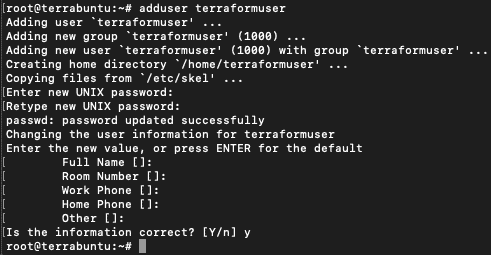
You’re currently logged in as root, and since it is best practice to work with a user without root privileges, you should create a new user. You can add a new user with the following command.
Copy# adduser username
Instead of “username”, enter the name you want the new user to have. You will then be asked to create a password for this user and to provide some information related to the user. You can leave the user information empty and skip it by pressing the Enter key.
When this is done, you should add the newly created user to the sudo group.
Copy# usermod -aG sudo username
Now switch to the newly created user
Copy# su - username

Update your system with these commands
Copy$ sudo apt-get update
$ sudo apt-get upgrade
We need to install “zip” so we can download the Terraform files.
Copy$ sudo apt-get install unzip
Before continuing with the download of Terraform, you should first create a directory where you can download the file.
Copy$ cd ~
Copy$ mkdir terraform_install && cd terraform_install
Download and install Terraform
You can download the Terraform Package from the download page of HashiCorp. Copy the download link for your OS and Architecture. Using wget in combination with the copied link you can start the download as follows.
Copy$ wget "download link"
Note: You should use the checksum after the download to check if the package was loaded correctly. This is explained on the download page of HashiCorp itself.
Unzip the downloaded file
Copy$ unzip
Now execute the following commands:
Copy$ echo export PATH=$PATH:~/terraform_install >> ~/.bashrc
$ source ~/.bashrc
Now run:
Copy$ terraform version
If the Terraform version is printed to the terminal, you’re ready to proceed.

gridscale Terraform provider
Next, I’ll show you how to get the necessary binary to use with gridscale and how to get examples that will give you a first insight into using gridscale as a provider. In this step I’ll also show you which path the binary must be in for it to work correctly.
First you create the following directory and then navigate to it:
Copy$ mkdir ~/.terraform.d/ && cd ~/.terraform.d/
Create a new directory called plugins and in it another one called linux_amd64 and change to it:
Copy$ mkdir -p plugins/linux_amd64 && cd plugins/linux_amd64
Here you can download the necessary Linux binary, which can be used with Terraform and gridscale as provider.
If you didn’t download the file to the current directory, move it here and rename the file:
Copy$ mv ~/.terraform.d/plugins/linux_amd64/terraform_provider_gridscale
The downloaded file is not executable yet. To change this, use the following command:
Copy$ chmod 755 terraform_provider_gridscale

Examples
Navigate back to the /.terraform.d directory with:
Copy$ cd ~/.terraform.d/
We have provided the examples in a git repository. You can clone them with the following command:
Copy$ git clone git@github.com:gridscale/terraform_examples.git
Examples Configuration
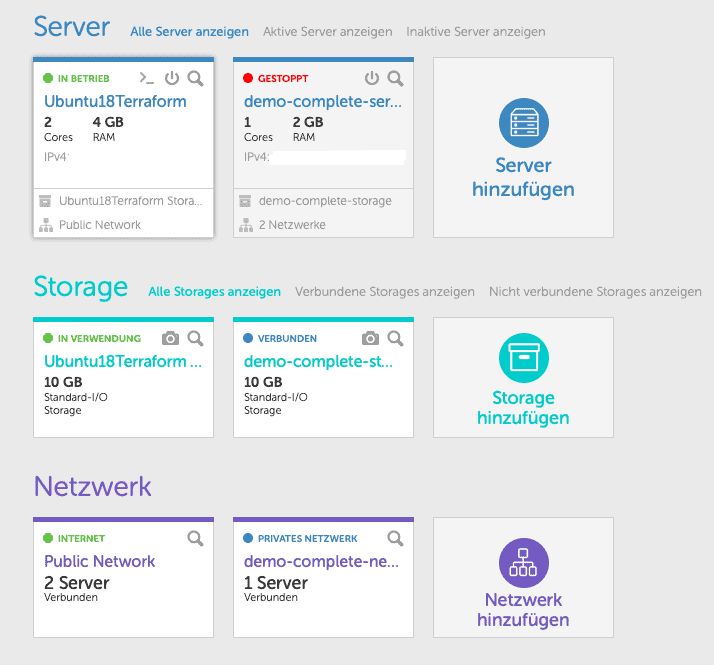
Now I will show you an example of how you can create servers, storage and networks at once with the help of Terraform. The other examples work on the same principle, but are application examples to create the corresponding resources individually. You can continue working with them afterwards.
First, navigate to the directory where your sample configuration file is located. In this case you navigate to the directory where the folder “complete” is located. Once you have done everything as described, the folder should be in the ~/.terraform.d/terraform-examples/single-server/complete directory. If the folder containing the examples is in a different directory, it is not critical. The only important thing is that you navigate to the appropriate directory where the folder was downloaded or moved.
Run the following two commands one after the other:
Copy$ terraform init
Copy$ terraform apply
Here you will be asked for your API token and for the UUID.
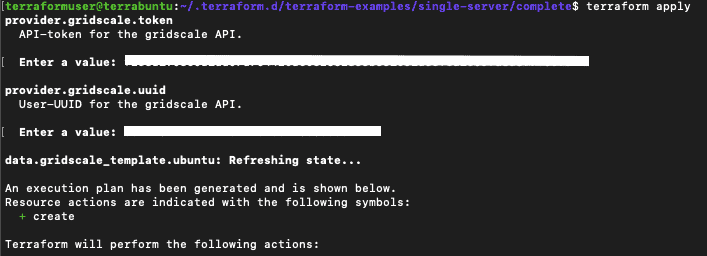
Via the following Link you navigate to the menu item “API-Keys” within the gridscale panel and create your API token via the button “Create API token”. Here you can also find your UUID at the same place. Now enter both in the terminal and confirm your entries at the end with “yes”. Now you should get a text with the corresponding configurations and server, storage and network should now exist in your panel.
So that you don’t have to enter your UUID and API token every time, there are two ways (using environment variables or configuration file) to store this information once in the machine to automate this process.
Using the Configuration file
You create another file with the extension .tf (e.g. provider.tf) in the folder where the file you want to execute is located. Type the following lines of code into this file and add your UUID and your API token within the quotation marks:
CopyProvider "gridscale" {
uuid = "deine uuid"
token = "dein Token"
}
Then you have to remove the top line of the file server.tf with provider “gridscale” {}, otherwise there will be a conflict with the previously created file, in which our provider is already specified.
To be able to create a file via the terminal, enter the following command:
Copy$ touch provider.tf

To open and edit a file you use the following command:
Copy$ nano provider.tf
Now you can navigate to this directory again via the terminal and execute the two commands terraform init and terraform apply and you will notice that you only have to confirm the execution with a “yes”.
It is also possible to add the information directly in the server.tf file instead of creating a new file. Here you keep the top line and add the UUID and API-token inside the braces.
Environment variables
With this method you don’t have to create an extra file with the lines of code shown above. So it is no longer necessary to remove the top line in the server.tf file. You have to open the terminal and enter the following command:
$ export GRIDSCALE_UUID=your uuid

$ export GRIDSCALE_TOKEN=your token
If you now run env in the terminal, you should see your environment variables, as well as your newly created variables.
If your SSH connection is disconnected, the environment variables you created will no longer exist. These are temporarily stored as long as the SSH connection is active.
You can remove your variables by using unset instead of export.
$ unset GRIDSCALE_UUID

$ unset GRIDSCALE_TOKEN
If you no longer need the infrastructure you have created, you can remove them by running this command:
$ terraform destroyNow take a look at the rest of the configuration files that we provided via our git repository, experiment and build upon them to easily manage the Infrastructure that you want. I wish you a lot of fun using Terraform and gridscale!