Getting started with PaaS by gridscale
Next Level: Platform-as-a-Service
⚠️ Notice: Some of the content in this tutorial is outdated and shows screenshots of our old Cloud Panel. To give you an introduction to our product world, we are leaving this tutorial online. Be sure to check out our new tutorials on gridStore, gridSQL, and gridFS!
With PaaS at gridscale we take our Infrastructure-as-a-Service to a new level. Our Platform services allow you to accelerate your development, offer easy scalability and therefore more flexibility. You don’t have to worry about server-related topics anymore, going Live with databases like redis, PostgreSQL and MySQL is done with just a few clicks in your gridscale panel. We take care of the reliable, security and maintenance of your database system.
In this Getting Started I’ll explain everything about gridscale’s platform services. Together with you I will create a first use case “Hello, PaaS at gridscale” for a redis and MySQL instance. The step-by-step examples cover all important information about creating a service within your gridscale panel and show you how to connect to the respective PaaS services.(different word for Services; German: PaaS-Dienste)
PaaS Features
- redis
- PostgreSQL
- MySQL
are currently part of the feature list of gridscale Platform services. In the future we will provide more services and innovative features for you. If you have any questions, suggestions or wishes, we at gridscale will always be happy to hear from you: Just contact us by e-mail at team@gridscale.de.
How do I connect to a Platform service?
All gridscale Platform services are accessible via IPv6 and the corresponding port. After creating a Platform service, in your gridscale panel, a new security zone is automatically generated. To connect to a Platform service, you must connect a server within your dashboard to the new security zone. Your Platform services are only available from servers in the same security zone as your Platform service.
What is a PaaS Security Zone?
Security Zones are normal networks, you can find them on your dashboard in the gridscale panel. A security zone is generated by the creation of a Platform service. For security reasons, the gridscale Platform services are located in another network zone and are therefore not connected to the Internet – Public Network.
Hello, PaaS at gridscale! – redis
In the following application example we create a redis Platform-as-a-Service instance on gridscale. redis is an open-source in-memory database for storing key/value data structures and belongs to the NoSQL database category. Redis is known for its flexibility and extremely high speed. Session caching and full page cache (FPC) are among the most common redis scenarios.
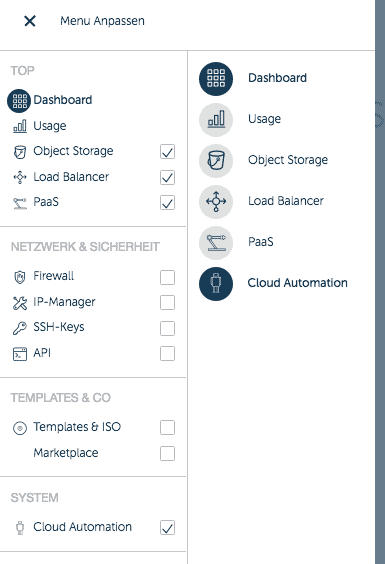
Step 1: Open PaaS in the panel
Go to the side menu within your gridcale panel to open PaaS. You can access the Platform services by clicking on “Customize menu”. Optionally you can add the link to PaaS to your menu by clicking on the checkbox.
Step 2: Create a Platform-as-a-Service
After switching to the Platform-as-a-Service area, select “Create Platform-as-a-Service”. In the menu that opens, you can define your PaaS instance:
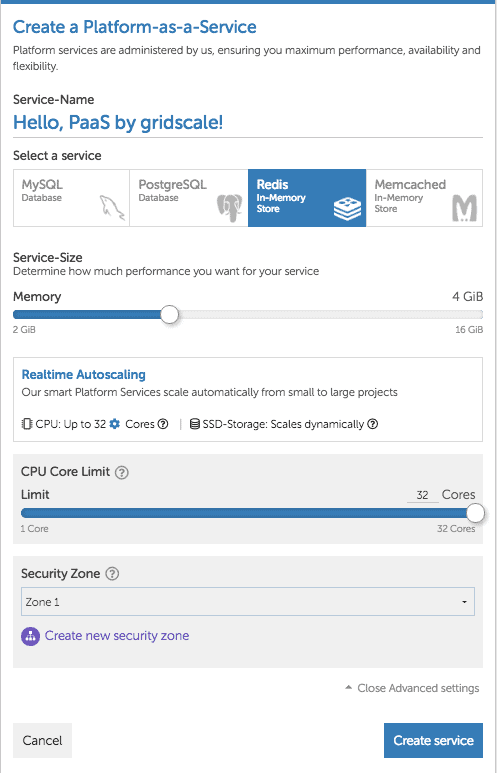
Under Servic, select redis, determine how much performance you want to provide for the redis database and assign a name.
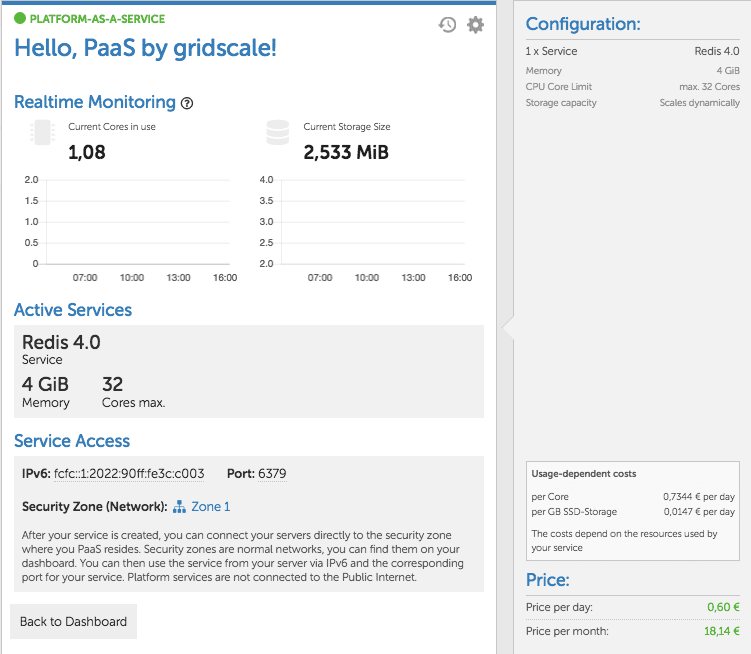
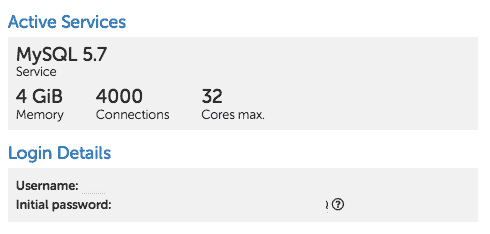
After a few seconds of provisioning time, the active service appears in the PaaS menu.

The gridscale PaaS are IPv6 only. IPv6 address, port, and all the details about your specific Platform service are available by clicking on the service tile.
When a Platform service is created, a security zone is also automatically added. The new security zone appears in your gridscale panel under Networks.
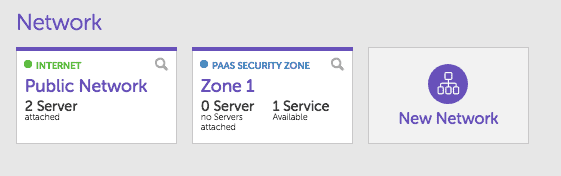
The gridscale PaaS services are not connected to the public network. To call your PaaS instance, you must add a server to the newly generated zone.
To do this, switch to the detail view of the server you want to connect to the Platform service on your dashboard. Use the + on Connected Networks to add the new security zone (note that it is only possible to add a new network when it is turned off).

Step 3: Connect to redis
You usually connect to your redis platform service via redis-cli. redis-cli is the command line interface of redis, it allows you to send commands directly to the redis server via your terminal and receive its responses.
The redis-cli can be selected in two different ways, in interactive mode and via attached arguments. In the further course we interact with the redis instance in interactive mode. This offers a good user experience and covers all basic tasks.
Once you have familiarized yourself with the redis-cli, you can perform much more demanding tasks. In this case it is recommended to have a look at the redis documentation.
Install redis-tools
The redis command line interface is part of the redis-tools package. Use the following command to install redis-tools on Ubuntu / Debian.
Ubuntu/Debian:
apt-get install redis-toolsEstablishing a connection
Execute the following command to connect to your redis-PaaS via redis-cli:
redis-cli -h [Your-IPv6-adress]We do not need to specify the port further for the connection, since the connection runs via the default port.
Testing the connection
After connecting you can test your connection with some simple redis commands:
[fcfc::1:30e8:60ff:fe66:----]:6379> set hello "PaaS at gridscale"
OK
[fcfc::1:30e8:60ff:fe66:----]:6379> get hello
"PaaS at gridscale"
[fcfc::1:30e8:60ff:fe66:----]:6379>
Further information and commands for operating redis-cli can be found under this link: redis-cli, the Redis command line interface.
Hello, PaaS at gridscale! – MySQL
In my second application example I create a MySQL platform service with you. The first two steps “Call PaaS in gridscale panel” and “Create PaaS service” correspond to steps 1 and 2 of my redis Use Case above.
Access data for the Platform services
When creating a MySQL or PostgreSQL platform service, access data (user name and initial password) are automatically generated. You can find these in the detailed view of the respective service in the PaaS panel area.
We strongly recommend to change the generated password immediately after installation!
Connect to MySQL
To connect to the MySQL service, you need the mysql-client or alternatively mariadb-client.
Using Ubuntu/Debian you install mysql-client with:
apt-get install mysql-clientAfter installing the client, you can connect to the service using the IPv6 address, port and the generated access data. Remember that the server from which you connect to your Platform service must be in the same security zone as your Platform service itself.
The syntax for connecting to MySQL is as follows:
mysql --host=[Your-IPv6-Adress] --user=[Your-generated-Username] --password=[Your-generated-Password]After you have logged in successfully, you will see a mysql prompt on your server terminal.
At this point you can test your database with a simple SHOW DATABASES; command and perform further operations. You can find more detailed information about the operation in the MySQL documentation.
mysql> SHOW DATABASES;
+--------------------+
| Database           |
+--------------------+
| information_schema |
| mysql              |
| performance_schema |
| sys                |
+--------------------+
4 rows in set (0.00 sec)

mysql>