Multiple websites on one server thanks to vHost
Apache is one of the most widely used HTTP server systems currently on the market. This is not only due to the simple configuration, but also to the versatility and stability of the system. In order to run one or more websites on the server and to ensure that all domains are mapped to the correct folder, there are so-called vHosts, i.e. virtual hosts. Each vHost is responsible for a project or a website and can link it to any number of domains. If several projects are running on the server, a vHost is created for each of them and linked to the necessary information. So a server can contain several web pages. The corresponding domains all point to the same IP and yet to different websites, all thanks to the vHosts. Today I will show you how to configure them and create a server for any number of websites.
Preparations
Quickly create a server with Ubuntu 16.04/18.04 LTS at a provider of your choice – with gridscale it only takes a few seconds. Then connect to the server as root via SSH and update your server to the latest version. You can use the following command to do this:
Copyapt -y update && apt -y upgrade && apt -y dist-upgrade
Then quickly install Apache:
Copyapt -y install apache2
If you now enter the IP of your server in the address bar of your browser, the example page of Apache will open. Here you can redirect all domains to your web pages to the server. To do this, create an A-Record and an AAAA-Record with your domain provider to enable both IPv4 and IPv6 support. Then teach your Apache to listen to both IPv4 and IPv6 by editing the following file:
Copynano /etc/apache2/ports.conf
In addition to “Lists 80” or “Lists 443”, you also create the entries “Lists ::::80” and “Lists ::::443”. The whole thing should look like this:
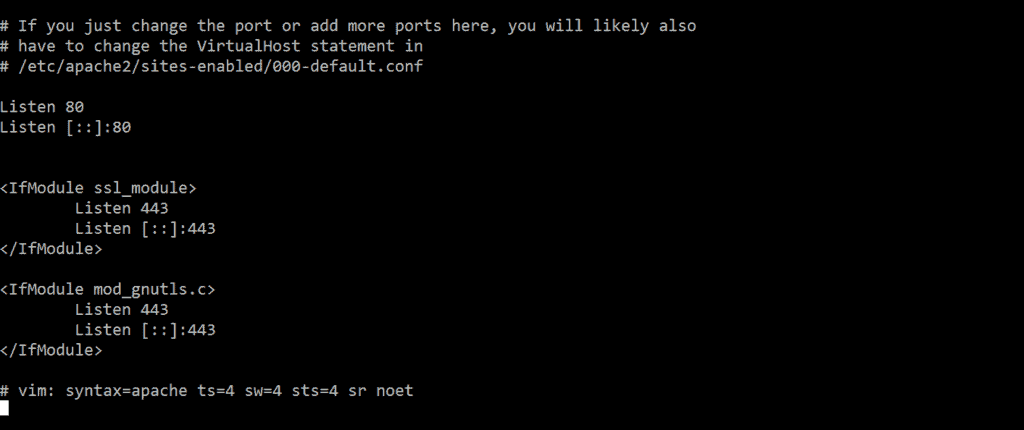
In this article I will create three websites. The first gets the domain vhost1.my-domain.tld, the second vhost2.my-domain.tld and so on. All three sub-domains now point to my server via A- or AAAA-Record. Of course, this also works with top-level domains.
Next the three websites are created, first you create three folders:
Copymkdir /var/www/Seite1 && mkdir /var/www/Seite2 && mkdir /var/www/Seite3
Next, I put a simple web page in each folder, each of which outputs its own content:
Copynano /var/www/Seite1/index.html
Content of the file:
Copy<html><head><title>Seite 1</title></head><body><h1>Seite 1</h1></head></html>
Now you can repeat the whole thing for the other two sides as well.
Then you have to choose the right owner for the folders:
Copychown www-data:www-data -r /var/www/*
If you now go to the website of your server again, you will notice that nothing has changed. This is because it is not enough to create the web pages. You also have to map them in a vHost.
Create vHost
Whether it’s vHosts, mods or configs, Apache stores them in the /etc/apache2/sites-available/ or /etc/apache2/mods-available/ folder and so on. These must then be enabled. Once activated, a link is placed in the /etc/apache2/sites-enabled/ or /etc/apache2/mods-enabled/ folder. The currently activated mods and vHosts cached Apache on startup, which means that after each activation a reload of Apache must take place for it to take effect.
But one after the other. Change in your console to /etc/apache2/sites-available/
Copycd /etc/apache2/sites-available/ && ll
Now you will see two sample configurations, one for HTTP and the other for HTTPS. You can have a look at them, but they are not needed for this tutorial, so you can delete them. But first you should deactivate them for Apache:
Copya2dissite 000-default.conf && a2dissite default-ssl.conf && rm -r 000-default.conf default-ssl.conf
Now create your own Conf with the following content:
Copynano /etc/apache/sites-available/seite1.conf <VirtualHost vhost1.meine-domain.tld:80> ServerName vhost1.meine-domain.tld #You only need the following record if you want to use a top-level domain or point several domains to this project (.com, .de, .net, …): #ServerAlias www.meine-domain.tld ServerAdmin webmaster@vhost1.meine-domain.tld #insert your real domain here DocumentRoot /var/www/Seite1 ErrorLog ${APACHE_LOG_DIR}/vhost1_error.log CustomLog ${APACHE_LOG_DIR}/vhost_access.log </VirtualHost>
You can simply copy the file now. Then change the path and the domain for the other vHosts.
Copycp /etc/apache2/sites-available/seite1.conf /etc/apache2/sites-available/seite2.conf
When you are done, you should have a config file in the /etc/apache2/sites-available/ folder for each of your projects. These files should contain the appropriate document root for each project and a list of all associated domains.
When you’re ready, enable the individual vHosts:
a2ensite seite1 seite2 seite3 && service apache2 restart
For explanation: a2ensite -> Apache 2 enable Site; seite1 -> /etc/apache2/sites-available/seite1.conf;
Now you can enter the domains one by one into your browser and should be redirected to the correct page. To automatically redirect all requests to HTTPS, you can either manually configure a rewrite or let Let’s Encrypt do the work. I suggest you take the easy way and then I’ll show you exactly what happened.
Let’s Encrypt
First you install Let’s Encrypt and the Apache2 plugin:
Copyapt -y install python-letsencrypt-apache
In the next step it is important that you specify ALL domains located on this server and ALL sub-domains. This can be quite a lot under certain circumstances:
Copyletsencrypt --apache -d vhost1.meine-domain.tld -d vhost2.meine-domain.tld -d vhost3.meine-domain.tld
If you use top-level domains, there are even twice as many entries:
Copyletsencrypt --apache -d meine-erste-domain.tld -d www.meine-erste-domain.tld -d meine-zweite-domain.tld -d www.meine-zweite-domain.tld -d meine-dritte-domain.tld -d www.meine-dritte-domain.tld
Now Let’s Encrypt will ask you for your email address. This should be an email address that you check regularly, as it contains important information and notifications, such as the imminent expiration of your certificate.
You will then be asked to accept the terms and conditions. In the last step you specify that Let’s Encrypt should configure the web server “Secure”. This means that Let’s Encrypt will rebuild our vHosts on our behalf so that they automatically forward to HTTPS port 443 and all requests, whether HTTP or HTTPS, will be processed via HTTPS.
After a short wait Let’s Encrypt should congratulate you on your new certificate. And the configuration is finished.
Let me show you what Let’s Encrypt did with our vHosts.
Open your previously created config files:
Copynano /etc/apache2/sites-available/seite1.conf
As you can see here, Let’s Encrypt has created a RewriteRule at the end of the file:
CopyRewriteEngine on RewriteCond %{SERVER_NAME} =vhost1.meine-domain.tld RewriteRule ^ https://%{SERVER_NAME}%{REQUEST_URI} [END,QSA,R=permanent]
Explanation: “RewriteEngine on” switches the rewrite module, which is responsible for rewriting URLs, on or off.
„RewriteCond“ is the condition that must be fulfilled for the rule to occur. In this case the ServerName should be vhost1.my-domain.tld.
„RewriteRule“ If the rule applies, the URL will now be recompiled as follows: https://[ServerName]/[EverythingThatWasPreviouslyBehindTheServerName]
If you now write http://vhost1.meine-domain.tld/ThisIsATest in the address bar of your browser and send the request, you will be forwarded to https://vhost1.meine-domain.tld/ThisIsATest.
If you look at the other vHost Configs, you will notice that this was done with every Config you created, in addition to your Configs also new ones with the extension -le-ssl.conf were created. Open the first one and have a look:
Copynano /etc/apache2/sites-available/seite1-le-ssl.conf
As you can already see in the first two lines, this is about the HTTPS requests on port 443. All data from the original config have been taken over. In addition a few more entries have been added.
CopySSLCertificateFile /etc/letsencrypt/live/vhost1.meine-domain.tld/fullchain.pem SSLCertificateKeyFile /etc/letsencrypt/live/ vhost1.meine-domain.tld /privkey.pem Include /etc/letsencrypt/options-ssl-apache.conf
Here you can define with which certificate your server should certify itself to the browser. Also /etc/letsencrypt/options-ssl-apache.conf will be added to the config. This contains additional parameters that are generally valid for SSL connections to servers with Let’s Encrypt certificates.
Note that every time you make a change to a VHOST, Apache2, you must reload the configs.
Copyservice apache2 reload
Conclusion
vHosts are relatively easy to create and offer the possibility to assign queries to servers with different domains to the correct websites. They can also be used to configure individual web pages, such as redirects or server aliases. If you want to know what else you can do with vHosts, read this article: Set up an Apache server as a reverse proxy. Here I show you how to build your own loadbalancer with Apache.
More information about gridscale and how gridscale works can be found in our article How to gridscale.